AlertResponder – Automatic Security Alert Response Framework By AWS Serverless Application Model
Overview
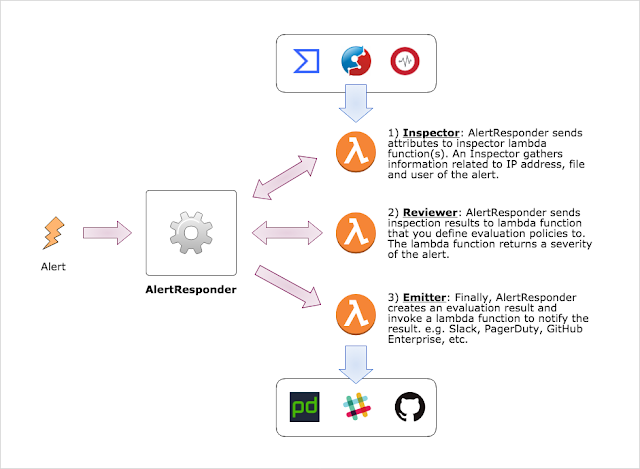
AlertResponder receives an alert that is event of interest from security view point and responses the alert automatically. AlertResponder has 3 parts of automatic response.
- Inspector investigates entities that are appeaered in the alert including IP address, Domain name and store a result: reputation, history of malicious activities, associated cloud instance and etc. Following components are already provided to integrate with your AlertResponder environment. Also you can create own inspector to check logs that is stored into original log storage or log search system.
- VirusTotalInspector
- Reviewer receives the alert with result(s) of Inspector and evaluate severity of the alert. Reviewer should be written by each security operator/administrator of your organization because security policies are differ from organazation to organization.
- Emitter finally receives the alert with result of Reviewer’s severity evaluation. After that, Emitter sends external integrated system. E.g. PagerDuty, Slack, Github Enterprise, etc. Also automatic quarantine can be configured by AWS Lambda function.
- GheReporter

Concept
- Pull based correlation analysis
- Alert aggregation
- Pluggable Inspectors and Emitters
Getting Started
Please replace follwoing variables according to your environment:
$REGION: Replace it with your AWS region. (e.g. ap-northeast-1)$STACK_NAME: Replace it with CloudFormation stack name
$ curl -o alert_responder.yml https://s3-$REGION.amazonaws.com/cfn-assets.$REGION/AlertResponder/templates/latest.yml
$ aws cloudformation deploy --template-file alert_responder.yml --stack-name $STACK_NAME --capabilities CAPABILITY_IAM
Development
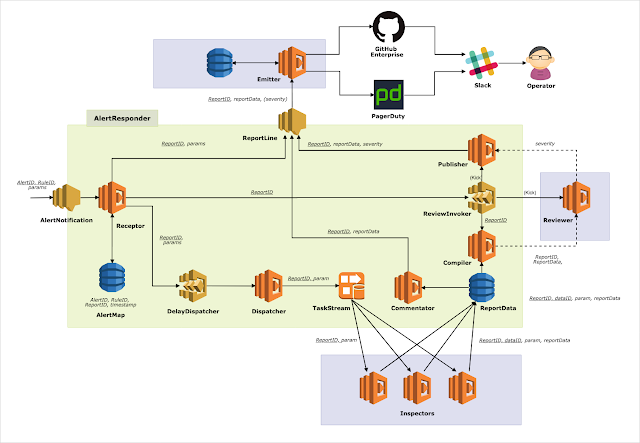
Architecture Overview


Prerequisite
- awscli >= 1.16.20
- Go >= 1.11
- GNU automake >= 1.16.1
Deploy and Test
Deploy own AlertResponder stack
Prepare a parameter file, e.g. config.json and run make command.
$ cat config.json
{
  "StackName": "your-alert-responder-name",
  "TestStackName": "your-test-stack-name",
  "CodeS3Bucket": "your-some-bucket",
  "CodeS3Prefix": "for-example-functions",

  "InspectionDelay": "1",
  "ReviewDelay": "10"
}
$ env AR_CONFIG=config.json make deploy
NOTE: Please make sure that you need AWS credentials (e.g. API key) and appropriate permissions.
Deploy a test stack
After deploying AlertResponder, move to under tester directory and deploy a stack for testing.
$ cd tester/
$ make AR_CONFIG=../config.json deploy
You can see param.json that is created by script under tester directory after deploying.
$ cat params.json
{
  "AccountId": "214219211678",
  "Region": "ap-northeast-1",
  "Inspector": "slam-alert-responder-test-functions-Inspector-1OBGU89CT1P4B",
  "Reporter": "slam-alert-responder-test-functions-Reporter-1NDHU0VDI8OPA"
}
Then, back to top level directory of the git repository and you can run integration test.
$ go test -v
=== RUN   TestInvokeBySns
--- PASS: TestInvokeBySns (3.39s)
           (snip)
PASS
ok      github.com/m-mizutani/AlertResponder    20.110s
